
[Kubernetes] Step by Step: Deploying Openshift on vSphere
[Kubernetes] Step by Step: Deploying Openshift on vSphere
During my journey through Kubernetes, the technologies that I have had the opportunity to work with the most have been the ones of VMware (vSphere with Tanzu and TKG), but the other day I got curious to try other technologies, so I decided to get down to work and deploy Openshift on my vSphere lab.
To my surprise, it was much easier than I thought, and that’s why I bring you this basic deployment tutorial, which I hope will help to those ones who are curious too.

Requirements
- vSphere 6.5 or superior with HW virtual v13 at least
- Enough resources to host the infrastructure (Link)
The default deployment requires 4 vCPUs/16GB de RAM for each Master Node and 2vCPUs/8GB for Worker
- A dedicated network with DHCP server
- A DNS server reachable from the network previously said
- A VM Linux or Mac OS to run the installer
- A RedHat console account (Link)
Step 1: Downloading the installer and preparing the VM:
We need to access to the Openshift download site and download the OpenShift Installer, Secret and CLI-Tools:

If we have not downloaded them directly from our Linux VM, we upload them to it using our preferred method.
Then proceed to unzip the installer and copy the binary from the console to /usr/local/bin
tar xvf openshift-install-linux.tar.gz
tar xvf openshift-client-linux.tar.gz
cp oc /usr/local/bin/

1.1 Adding the vCenter certificates as trusted certificates into the VM
The OpenShift installer requires the VM to trust our vCenter’s certificates. If our vCenter already has a certificate issued by a trusted CA, we can skip this step.
This step may vary depending on the linux distribution we are using, in my case I use Ubuntu and the steps are as follows:
wget https://<tu hostname o IP de vcenter>/certs/download.zip --no-check-certificate
unzip download.zip
cp certs/win/* etc/ssl/certs
sudo update-ca-certificates

To verify that the certificates have been installed correctly, we can launch a CURL to our vCenter server, if we do not receive any error, the certificate is valid and we can continue:
curl https://<nuestra FQDN o IP de vCenter>

1.2 Creating an SSH private key
For the Openshift installer to be able to communicate with the machines it deploys, it will be necessary that our installation machine has a private SSH key.
If you already have it, you can skip this step.
To create this key, we will run the command:
ssh-keygen -t rsa -b 4096 -N '' -f ~/.ssh/id_rsa

Once this is done, our key will be ready.
Step 2: Preparing the newtork
The next step is to prepare our network infrastructure for deployment. For this we will need to create our network with a DHCP server and reach to a DNS server that can be inside the network itself or be routed.
In my case, I have created the network on an NSX-T segment where I have enabled DHCP Gateway, but this topology could be mounted without problems in a traditional VLAN network with DHCP server based on WinServer or Linux.

Important: Reserve at least 2 IPs outside of the DHCP range in the network for the Api and Ingress (next step)
2.1. Creating the DNS records
Next, we need to create the following DNS records
- api.<cluster-name>.<basedomain> – Esta será la FQDN de la API de Kubernetes
- *.apps.<cluster-name>.<basedomain> – Aquí se desplegarán los servicios de Ingress, que entre otros nos darán acceso a la consola de Openshift
The IPs should be outside of the DHCP range configured previously

Once this is done, our network will be ready for the deployment.
Step 3: Deploying Openshift
If we have come this far, we have everything ready to move forward with the deployment of our cluster!
First of all, we will create an installation folder where the installation data, logs and temporary installation data will be stored.
mkdir /home/juan/openshift/install
Then, we can begin with the installation process
./openshift-install create cluster --dir=/home/juan/openshift/install --log-level=info
The script will start and ask for some information:
- Publica SSH key – Here we choose the public key created in the step 1.2
- Platform – We will select vSphere
- vCenter – our vCenter IP or FQDN
- Username – Our vCenter username
- Password – Our vCenter password
- Datastore – The datastore where the VMs will be deployed
- Network – The network configured in the step 2
- VIP for API – The DNS registered IP for the API
- VIP for Ingress – The DNS registered IP for the ingress
- Base Domain – Our Base Domain
- Cluster Name – The cluster name, it must match with the DNS record
- Pull secret – Here we paste the content of the txt downloaded from Red Hat site in the step 1

With this data, the installer will start to work and for us… It´s coffee time! because it will take long…

Once the installation is done, the wizard will indicate the URL to access the console and the default password:

The kubeconfig is located in the installation folder inside the auth subdirectory and we can use it with kubectl or oc, or move it to our ~/.kube directory to be the default kubeconfig:

3.1 Deploying a test Pod
Within the console, we can start creating projects and “play” with Kubernetes. For example, to finish this entry, we are going to create a test Pod:
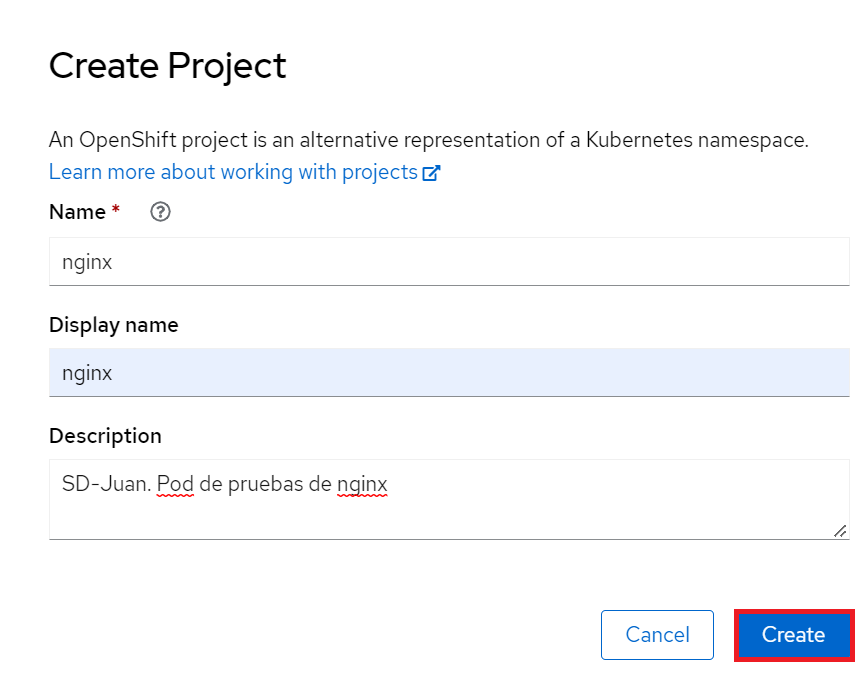
- Go to the Projects section and click on Create Project:

- This will create a new namespace within our kubernetes cluster, we will call this project, nginx:
- Then, in the side menu, go to Workloads – Pods, choose your project and click on “Create Pod”.

- Here we can apply our yaml, and create our pod:

- After a few seconds, our pod will be ready, we will be able to verify it both in the console and with kubectl/oc:


And…

I hope you have enjoyed reading this post as much as I have enjoyed during this lab, as always, any feedback it´s greatly appreciated.
Keep an eye on my blog if you want to read more future content regarding K8s, AVI LB Integration with clusters or Tanzu